


Le Tonkinois Varnish
B & D Murkin
UK main importers for
Le Tonkinois varnish
Flexidisc sander
Adding a remote temperature sensor
Our cheaper alternative sensor.

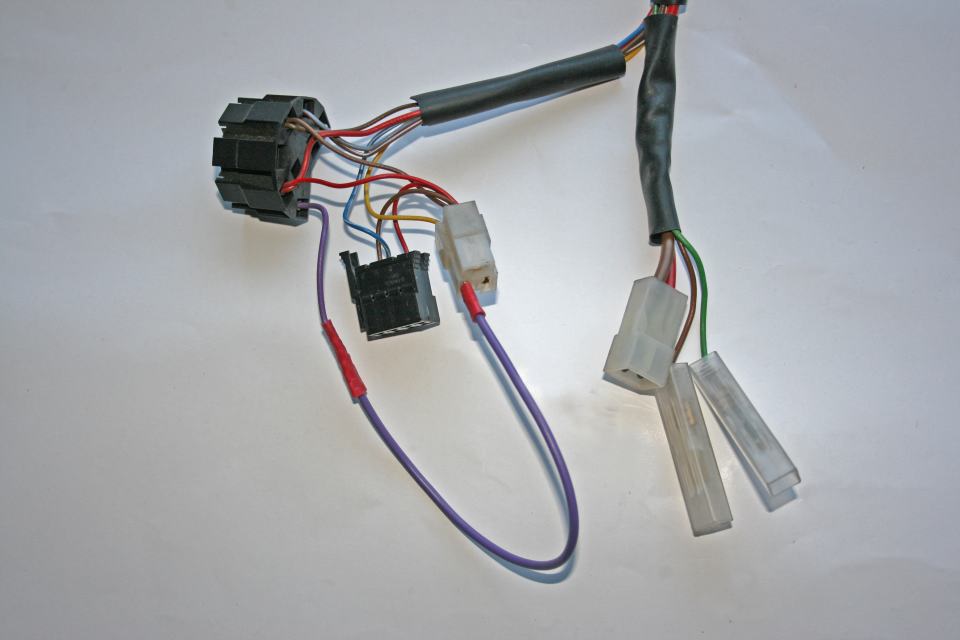
D1LCC loom connector.
My ex BT D1LCC loom had no grey wire.
To install the remote temperature sensor join it to the grey and brown/white loom wires. The sensor is not polarity dependent so can be connected either way round. In the loom connector the brown/white wire is on pin 13 and the grey wire on pin 8. The far end of the brown/white wire will be connected to the controller. You will need to join to that wire for the sensor, leaving the existing wiring intact.
The remote end of the grey wire may be folded back inside the loom sheath or cut off short. Do not confuse it with the grey/red wire which can look grey from some directions but has a narrow red stripe. If it enters the loom sheath but there is no sign of it coming out you may need to pull it back completely. Some looms are from ex BT vans and they did not have the grey wire fitted, in that case you will have to install one as shown below. If you are using the remote sensor in an 801 controller only the grey wire will be needed, the sensor is already connected to the brown/white inside the 801. During the start up checks the Eberspacher looks for the presence of the remote sensor and selects it automatically
Adding the grey wire to an ex BT D1LCC wiring loom
Looms from ex BT vans did not have the grey wire fitted.
We also had two looms with no brown/white wire fitted, they used the brown instead. This is probably not common but if yours is the same you should add a brown/white at the same time.
Eberspacher remote sensor 35 x 35 x 20 mm.
Other versions have a rectangular box.
Air Heater Symptoms:
The Eberspacher set temperature control has very little relationship to ambient temperature.
When a remote sensor will not help.
Before describing when to fit a remote sensor it may be helpful to understand what it won't cure.
Eberspacher temperature regulation is not brilliant. They have 4 (less for some models) fixed heat output settings and some tweaking of the control is often required. Eberspacher documents say Airtronic heaters will maintain a temperature within approximately 4°C (7°F) of the desired heat comfort level by regulating between Power, High, Medium or Low heat output. Should the temperature rise above the desired heat comfort level by 2°C or more, it will then switch itself off until the air temperature drops down by approximately 4°C. Assuming the 4°C quoted is from the switch off and not from the comfort level temperature the temperature can change by 4°C from when the heater switches off to when the heater is restarted. I am more familiar with temperatures in Fahrenheit, if it switches off at 70°F it might be 63°F before it restarts, distinctly chilly! This poor temperature control will not be changed by fitting a remote sensor in a normal position. However altering the sensors position can reduce the problem, details below. Derek's tip for his Airtronic D2: If you feel cold when heater is in standby just tweak the control higher for a couple of seconds then return it to original setting, that usually restarts it.
When a remote sensor will help.
The set temperature controller does not have a temperature sensor inside, all it does is to ask the Eberspacher to set its output for the temperature set on the controller. The actual heat sensor is located inside the Eberspacher heater body in the heated air inlet and it adjusts the power output accordingly. Whilst this arrangement is ok for some small areas it does not control very well when the Eberspacher is situated far from the heated area as the temperature changes may be different. Open a door or a window and you will have to change the controller setting to remain at the same temperature. It fails completely when the heater is fed from fresh air. The sensor then thinks that the temperature of the outside air is the ambient temperature and of course that does not change as the heated area warms up. Even worse if the outside temperature drops below its lowest setting, usually between + 5 and + 10°C, the Eberspacher can automatically switch to maximum heat output, completely ignoring the temperature controller setting.
The solution to both of these is to fit a remote temperature sensor, wiring instructions are given below for several models. You may have to experiment to find the best location for the sensor, avoid cold walls and drafts. Hot air rising from laptops, phone chargers etc can cause the sensor reading to change if it is mounted above them. Note that the fan usually rotates about 600 rpm when in standby to circulate air to the internal temperature sensor but with a remote sensor fitted the Airtronic / D1LCC / D3LCC fan does not rotate. I am not sure if this applies to other models. Some forum articles say you need a 7 day timer to fit a remote sensor, as with much advice found on forums this is not true. The 801 controller has a built in optional remote temperature sensor which can be connected if required. See Controllers page for details.
If the 801 controller position is not ideal, like on a cold outside wall or in a draft, a separate remote sensor may still be needed. I occasionally get asked if more than one sensor can be fitted, details below.
Our spare Airtronic wiring loom. On this loom the grey and second brown/white wires terminate in the white 4 pin power connector.
Airtronic D2 D4 D5 loom connector.


To install the remote temperature sensor join it to the grey and brown/white loom wires. The sensor is not polarity dependent so can be connected either way round. In the loom connector the brown/white wire is on pin 6 and the grey wire on pin 12. The far end of the brown/white wire will be connected to the controller. You will need to splice into that wire for the sensor unless you are very lucky and have a loom like this which has two brown/white wires. The remote end of the grey wire should be found easily but sometimes it may be folded back inside the loom sheath or cut off short. Do not confuse it with the grey/red wire which can look grey from some directions but has a narrow red stripe. If it enters the loom sheath but there is no sign of it coming out you may need to pull it back completely. Advice on refitting the wire into the loom is in the D1LCC section. If you are using the remote sensor in an 801 controller instead of a separate sensor only the grey wire will be needed, that sensor is already connected to the brown/white inside the 801. During the start up checks the Eberspacher looks for the presence of the remote sensor and selects it automatically.
Fitting a remote sensor to Eberspacher D1LCC and D3LCC

Remove the glowpin wiring nut, its connector is a single part. Tip:-


In this loom the cover was welded in place so the central v shaped lug needed cutting off to clear the hole.
Pin 8 hole is partially blocked by the cover retaining lugs. The cover should swing outwards after the lugs are prised up to allow the pin to be inserted.
The new grey wire in place.
Make sure the wire is really secure on the pin and that the pin orientation is correct before inserting from the back. Once it is locked in you will not be able to remove the pin without a special removal tool.
Getting the grey wire into the wiring loom sheath
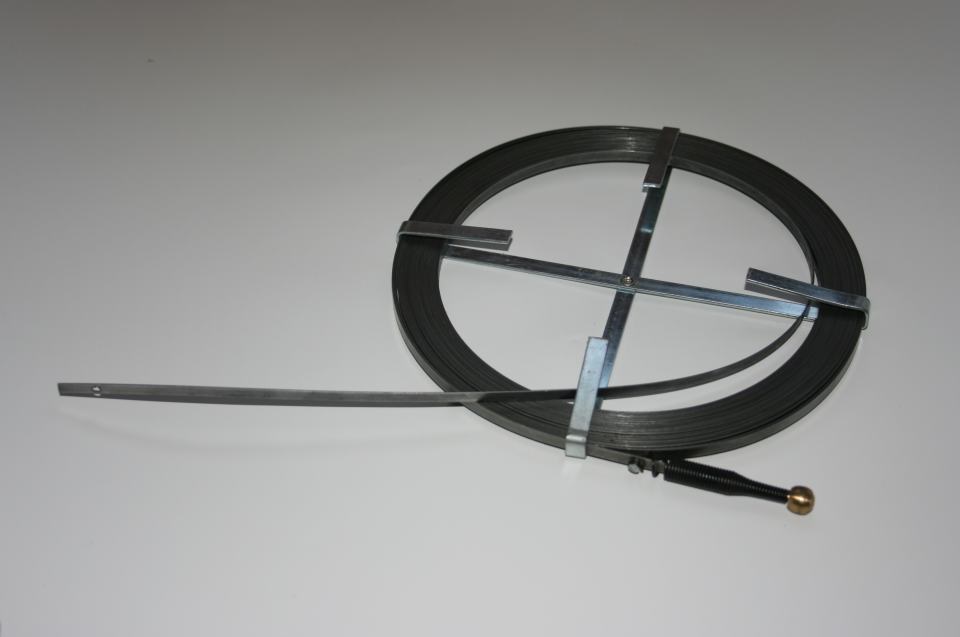
Wires run outside the sheath look unprofessional and have less mechanical protection. It is almost impossible to push a flexible wire through the loom sheath unaided. I use a Wiremans tape. These are also sold as Drain unblockers which can be bought on Ebay for about £2. Alternatively use a length of fairly stiff wire. Thread the thin end of the tape through the sheath from the opposite end to the wire. You may have to wiggle the sheath about as you push. Attach the wire to the tape and pull back gently.
Tip: Wrap the wire round the metal tape. Secure with plastic insulating tape, extending it for a few extra cm increases the hold on the wire and the metal tape. This method helps reduce jamming when pulling the wire through but allows the joint to separate if it does get jammed.
Metal Wiremans tape & Drain unblocker.
It is a thin strip of springy steel roughly 5mm by 0.5mm. They are available in several lengths.
Fitting a remote sensor to Eberspacher D1LC D3LC and D5LC
D1LC temperature sensor connector.
D1L D2L D3L, water heaters are unsuitable for remote sensor
Older models which use thermostats are not suitable for the installation of the remote sensor. The thermostat can be relocated to achieve the same effect. Water heaters also are unsuitable.
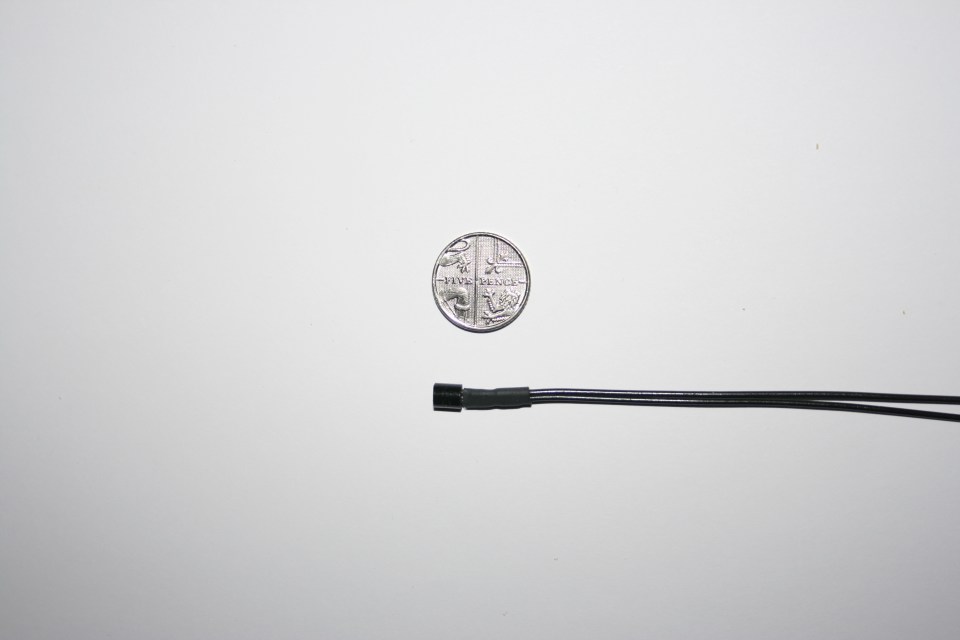
Finished sensor with five pence coin, 18 mm diameter, for size comparison.
A neat way for soldering wires to the sensor. Put heat shrink sleeving (Ebay) over wires as shown, solder before sliding over joint and shrink with a heat gun. If you have no heat gun you can heat gently with the soldering iron, avoid the tip as solder will stick to the sleeving. Other colours of wire and sleeving may provide a better match to the background where it is fitted.
There are 3 sensors in this photo.
If you cant see them click on photo to reveal where they are.
Eberspacher and my sensor showing size comparisons. My sensor is very unobtrusive so can be placed in positions where the larger Eberspacher version would be highly visible. Derek dangles his from a shelf so it is away from cold walls.
D5LC temperature sensor connector.
Fitting a remote temperature sensor to an Eberspacher air heater
One end of the remote temperature sensor connects to the heater grey wire.
The other end is connected with the wires already on the brown/white.
The Eberspacher detects the remote sensor automatically during start up and uses that instead of its internal sensor.
It is also possible to fit two external sensors, like one in the living area, the other in the sleeping area and to manually switch between them.
EasyStart Select general wiring with remote sensor.
EasyStart Select connections with Airtronic heater.
Connector pin fitted to new grey wire.
This was crimped but after having a couple of failures I now solder the pins onto the wire.
I have a small quantity of pins to go with my sensors if needed.
These have a sensor connector so installation should in theory be simple. The D5LC connector has an additional wire in the connector.
D1LC and D3LC Unplug the internal sensor wire (single grey wire shown arrowed) and plug in the remote sensor in its place.
However in practice you are unlikely to find connectors that will fit so you will probably have to cut off the connector and join the remote temperature sensor to the grey and brown/white wires. The sensor is not polarity dependent so can be connected either way round. The unused wire(s) left over must not be connected at the same time as the remote sensor, insulate and tie back out of the way. Just in case you are wondering why the internal sensor only has one wire, it gets its earth connection via another route. If you are using the remote sensor in an 801 controller only the grey wire will be needed, the sensor is already connected to the brown/white inside the 801.
D5LC for some unexplained reason the yellow start wire is connected through the same plug as the remote sensor so you will need to cut the sensor wires and join them as for the D1LC, leaving the yellow wire through the connector.
Eberspacher EasyStart controllers and remote sensor
EasyStart controllers are items I do not want to get involved with, I have wasted a lot of time on them.
The EasyStart Select is a relatively new controller, I do not have one of these controllers as our Airtronics are older and do not have hkit so will not work with any of our heaters. They seem to be ok as standard controllers but the extremely limited feedback we have received indicates there may be some compatibility issues when other items are added.
Eberspacher say the remote sensor on EasyStarts should be wired as shown below on an EasyStart Select controller, ie one connection to the grey wire, the other connection to the brown/white which is also joined to the grey/red wire, not across the EasyStart terminals. Also note there is a connection between the grey/red and brown/white wires. The latest Airtronics S2 S4 wiring details differ, see bottom of page.
None of our heaters will work with EasyStart controllers so we are unable to test but we have received a confirmation that the sensor worked as expected on a D2.
Some Easy Start Plus drawings show an internal temperature sensor connected to pins 9 and 10.
I am not 100% certain but believe that sensor allows the controller to display the ambient temperature, it does not control the heat output. The internal sensor looks the same as a remote sensor but I am reliably informed the resistance values are different so our sensors cannot be used as a sensor on pins 9 and 10.
When a remote sensor may need some caution.
One condition we have encountered is a heater reducing heat or going into standby prematurely. In this case the heater was mounted in a small enclosed space with poor ventilation and the air temperature around it was being raised by heat radiated from the heater body and outlet ducting. There was no ducting for the air inlet so the Eberspacher was drawing heated air from the enclosed space which it thought was the room temperature. Fitting a remote sensor might be a solution but there is a potential problem of the Eberspacher overheating and this did occur when we tried one. Increasing the ventilation was the only option.
Cheap Remote Temperature Sensors
When I wanted two remote sensors for our heaters I thought the Eberspacher versions were very expensive at about £60 each. Being an electronics engineer I searched for the component that matched the data of their sensors. Minimum order and postal costs meant it was economical to buy far more than I needed. I still have plenty and am selling them at £10 plus postage, UK £1.70 first class, 87p second class, other countries £3.20 or two sensors for £20 post free. That is just for the sensor shown, it does not need a box.
The best email address to contact for ordering details is roymurkin@blueyonder.co.uk
At a later date I was able to confirm that was the same component Eberspacher uses. Derek was using one on his D2 heater and did comparison tests with the Eberspacher version shown, no difference. It may look as if we have cut off one lead but that is the way the sensor is manufactured.
The sensor takes very low current so almost any wire can be used. Bell wire or speaker cable is suitable. Connections can be made with a screw terminal block or by soldering wires to it which is a better method. Don't just twist wires together, although it may work for a while the wires will oxidise, any subsequent movement of the joint causes intermittent connections. Intermittent connections here would be a nightmare as any increase in resistance would cause the Eberspacher to think the temperature is higher than it actually is, so reducing the heating output. If the connection became even worse the Eberspacher could ignore it and switch back to the internal sensor. There would be no indication that this has occurred, only that the overall temperature control does not work as well as it should. The remote sensor can be checked by applying a small amount of heat to it which should reduce the heater output.
This type of sensor will also work with the newest heater models S2 and S4 but connection details differ.
Fresh air installation.
The internal temperature sensor measures the outside air temperature so fails to control the cabin temperature.
Temperature control on a fresh air installation requires a remote temperature sensor fitted in the cabin.
The following instructions apply to the Eberspacher sensor as well as my alternative. For EasyStart controllers and the new Airtronics S2 S4 see bottom of page.
Fitting a remote sensor to Airtronic D2 D4 & D5
Single remote temperature sensor
Switched remote temperature sensors.
Switch can be almost any SPDT or DPDT type.


Reducing temperature difference between Standby and Re-
The difference between the temperature at which the heater switches into standby and the temperature when it restarts is called hysteresis , quite large with Eberspacher heaters.
Heaters must have some hysteresis but you can reduce the amount of the temperature difference.
If you move the remote temperature sensor closer to the heated air outlet the air will be warmer.
The heater now thinks the room air temperature is higher than it really is.
To explain how it works let's take an example where the outlet heated air raises the air temperature around the sensor by 2 degrees.
The heater will shut off at a point 2 degrees lower than the temperature set on the controller.
(This is not a problem when in use, simply set the controller 2 degrees higher than the desired setting.)
When the heater goes into standby that localised heat stops and the remote sensor cools to the room ambient temperature, 2 degrees lower.
Once the temperature drops to the original switch on temperature the heater restarts.
The on / off temperature difference is reduced by that 2 degrees.
The reduction amount can be tweaked by changing the amount of heat going to the sensor.
Each start requires the glowpin to be energised, drop the hysteresis too low and battery power consumption and heater wear can become excessive. It will need some experimenting to get the desired result.
Also note most controllers do not have a sensor inside, all they do is tell the heater the required setting so moving them will not help.

Sensor moved closer to the heater outlet to reduce on / off temperature difference.
Airtronic S2 S4
This type of sensor should also work with the latest generation of Airtronic heaters.
The only information I can find is a Butler Technique wiring diagram which shows the sensor connected to brown/white and grey/red on an S2.